Showing posts with label Free Crochet Patterns. Show all posts

Friday, August 16, 2013

Free Crochet Pattern: Owl Pillow/Stuffie

So I have had this idea in my head ever since I made the "Oh So Cute Owl Purse". In fact as I was making the purse I was debating between a purse or a pillow but the purse took a lot less time so laziness won and I made a purse for my little girl :) This pattern follows the same pattern as the owl pillow.


I just LOVE how this turned out! The colors were inspired by a sweater my daughter had when she was about a year old. I have wanted to make this project in these colors for so long and today was just the right day :) I got to sit out back in the sunshine and make this (until a rogue wasp dive-bombed me! Then it got finished inside).

I am not going to go into a whole lot of detail about color switching and what not. You can do whatever you want with colors. A lot of the details (yarn type, gauge, and techniques) of how I did it are on my purse pattern so make sure to read that thoroughly. I did use a size G hook on this project. The finished owl pillow is small at about a foot tall? My daughter is sleeping with it in a death grip right now so you couldn't pay me enough to take it from her to measure it! I will try and add that detail later ;)

You could also use this same pattern below to increase the size of the purse to a more adult size. Obviously you just skip the part about stuffing it and sewing the top closed! I wanted to take more pictures but I could not for the life of me find the camera until after the project was done. Hopefully this is all clear enough. As with all of my patterns, they are free. I write them when I can because I enjoy it. There may be errors as I am the only pattern tester ;) Just let me know and I will try to find time asap to fix it. Please only make this project with that in mind.

Follow the link to the purse pattern above and complete it until row 4 (using a size G hook). You will continue to make it larger using the instructions below.

Row 5: Ch 2, hdc in same space, *1 hdc in each of the next 3 spaces, 2 hdc in next space, 1 hdc in each of the next 3 spaces*. Repeat from * to * around. Join in the top of ch 2 with a slip stitch.

Row 6: Ch 2, hdc in same space, *1 hdc in each of the next 4 spaces, 2 hdc in next space, 1 hdc in each of the next 4 spaces, *. Repeat from * to * around. Join in the top of ch 2 with a slip stitch.

Row 7: Ch 2, hdc in same space, *1 hdc in each of the next 5 spaces, 2 hdc in next space, 1 hdc in each of the next 5 spaces*. Repeat from * to * around. Join in the top of ch 2 with a slip stitch.

Row 8: Ch 2, hdc in same space, *1 hdc in each of the next 6 spaces, 2 hdc in next space, 1 hdc in each of the next 6 spaces*. Repeat from * to * around. Join in the top of ch 2 with a slip stitch.

This is as large as I made the "belly". If you want a larger pillow or purse just continue increasing with the pattern. Next row would be 2 hdc same space, 1 hdc in each of next 7 spaces and you keep increasing like that. I might actually make another larger one.

Now to make the "head"

Row 9: Ch 2, 1 hdc in each of the next 7 spaces, *2 hdc in next space, 1 hdc in each of the next 7 spaces*. Repeat from * to * 1 more time. Ch 2 and turn your work.

Row 10: 1 hdc in each of the next 8 spaces, *2 hdc in next space, 1 hdc in each of the next 8 spaces *. Repeat from * to * 1 more time, Ch 2 and turn your work.

Row 11: 1 hdc in each of the next 9 spaces, *2 hdc in next space, 1 hdc in each of the next 9 spaces* repeat from * to * 1 more time. Finish off.

This is the first side of your owl. Now make another one exactly the same way. I chose to make my first one with the color variation you see on the front and the back is all brown.

For the eyes: I made them a little different than the purse. Using a size G hook and brown yarn, ch 2, 9 sc in 2nd ch from hook. Join to the original ch 2 with a slip stitch. Ch 1, sc in same space, 2 sc in each space around. Join in the top of the first ch 1 with a slip stitch. Switch to white yarn. Ch 1, sc in same space, *2 sc in next space, 1 sc in next space* repeat from * to * around. Join with a slip stitch to the first ch 1. Finish off. Make another eye (obviously!).

Make the beak the same as the owl purse.

Sew your eyes and your beak on.

Match both sides of your pillow. Sew the sides up however you like. Check out the purse pattern to see how I sew mine. Leave the top open and lightly stuff the owl with wool stuffing. Finish sewing the top of the owl. Go back to the purse pattern and check out how I made the little tassels on the head.

That's it!!! I hope you enjoyed this pattern. You may use this pattern to create items to resell but do not resell the pattern. Also do not post this pattern on your blog for free as your pattern. You may use one picture and a link back to this original pattern. Thanks so much :) Don't forget to "like" Mama G's on Facebook!

If you see a mistake in this pattern, leave a nice comment below and I will fix the error as soon as I can! :)

Monday, February 25, 2013

Reusable Produce Bag from Orange/Onion Bag

Here is another pattern I had on our farm blog that is probably more appropriate to have over here. I made this pattern 3 years ago but I am still using these bags regularly. They are really fast and easy and best of all cheap. Have fun!

Orange bag/onion bag recycled drawstring produce bag pattern :)

So I think this is pretty easy but I thought I would put some instructions on how to make the produce bags.  This was something I really wanted to make to eliminate the need for the plastic bags at the store.  The added bonus is that you are using something else that would just get thrown out!  If you don't know how to crochet this is an easy skill to learn and pretty useful.


Start with an orange or onion bag.  Cut the bottom off.


With the yarn end on the inside of the bag, yarn over and draw thru a hole on either end of the bag.  This is going to be the top of the bag where the drawstring will be.


Ch 1, sc around the bag (count how many chains you make this will be how many you need for your drawstring.  This number will vary with each bag.).  Join to ch 1.


Ch 3, skip 1 ch and dc in next ch.  Ch 1 skip 1 ch and dc in next ch.  Continue this around the bag.  Join to top of ch 2.  Finish off.

Ch the number of sc you had.  This will be your drawstring.


Weave the drawstring in and out of your dc's.  Tie the two end together and there is the top of your bag!

The next step will be to close up the other end of your bag.


To do this you want to put your need thru both sides of the bag. Yarn over and pull the yarn thru.  Ch 1 and sc across the bottom.


This is what your bag should look like! (I couldn't take a pic with the new bag...it's the end of the week so we have ate all of our fruit already!)

Using these bags eliminates another source of waste which is awesome!  Make these for people you know or give them away to anyone who will use them!!!

Saturday, February 16, 2013

Free Crochet Pattern: Asymmetrical Toddler Hat

I have been on a hat making rampage lately. Probably because winter is almost over and I feel like I haven't taken advantage of making enough hats. I really wish I would get this motivated in the fall! Good new is these should all fit my daughter next year too.

This hat is a crochet, Downton Abbey inspired hat!


This hat has a pinched back and a grey strip in the back with the asymmetrical flap in the front. I really like how this turned out! I hope you like it too :)

 
Without buttons.

 
With buttons!
 
Asymmetrical Toddler Hat

What you need:

Yarn: Paton's 100% Wool Yarn (worsted weight, 2 colors)

Hook: F

Foundation Row: Ch 2, 7 sc in 1st ch. Slip stitch in top of ch 2.

Row 1: Ch 1, 1 sc in same space, 2 sc in each space around (16 sc) Join in first ch 1 with a slip stitch.

Row 2: Ch 1, 1 sc in same space, 1 sc in next space *2sc in next space, 1 sc in next space* repeat around. Join in first ch 1 with a slip stitch.

Row 3: Ch 1, 1 sc in same space, 1 sc in next space x2 *2 sc in next space, 1 sc in next space twice* repeat around. Join in first ch 1 with a slip stitch.

Row 4: Ch 1, 1 sc in same space, 1 sc in next space x3 *2 sc in next space, 1 sc in next space x3* repeat around. Join in first ch 1 with a slip stitch.

Row 5: Ch 1, 1 sc in same space, 1 sc in next space x4 *2 sc in next space, 1 sc in next space x4* repeat around. Join in first ch 1 with a slip stitch.

Row 6: Ch 1, 1 sc in same space, 1 sc in next space x5 *2 sc in next space, 1 sc in next space x5* repeat around. Join in first ch 1 with a slip stitch.

Row 7: Ch 1, 1 sc in same space, 1 sc in next space x13 * 2sc in next space, 1 sc in next space x13* repeat around. Join in first ch 1 with a slip stitch.

Row 8: Ch 1, 1 sc in same space, 1 sc in next space x14* 2sc in next space, 1 sc in next space x14* repeat around. Join in first ch 1 with a slip stitch.

Row 9-18: Ch 1, sc in each space around. Join with slip stitch in first ch 1.

Row 19,20: Switch to second color. Ch 1, sc in each space around. Join with slip stitch in first ch 1.

Row 21: Switch back to main color, ch 1, slip stitch in each chain until last 21 stitches. Switch back to secondary color, 1 sc in next 7 spaces, 1 hdc in next 7 spaces, 1 dc in next 7 spaces (this starts the flap in the front). Ch 2, turn.

Row 22: 1 dc in next 7 spaces, 1 hdc in next 7 spaces, 1 sc in next 7 spaces, switch back to main color, slip stitch in remaining spaces, ch 1 turn.

Row 23: Slip stitch in each chain until flap, switch to secondary color, 1 sc in next 7 spaces, 1 hdc in next 7 spaces, 1 dc in next 7 spaces, ch 2 turn.

Row 24: 1 sc in next 21 spaces, cut yarn, finish off.

Enjoy!

Wednesday, February 13, 2013

Free Pattern: Classy Toddler Cloche

I just looove Downton Abbey so I have been wanting to make a cloche for my daughter for awhile and I finally sat down and did it! I like how it turned out, although I might try again using sc and making it a bit bigger. I thought I would go ahead and post the pattern here for this one (using hdc). This fits my daughter who is 3 1/2 and would probably fit a 3-4 year old. I have been getting quite a few emails lately from people asking me to adjust the pattern to fit a different size. As much as I wish I could do that, I really don't have the time so please keep that in mind when deciding if you should make this pattern or not. You should be able to judge if it will fit your little one as you are making it. This is an untested pattern so if you find a mistake, just leave a comment below and I will fix it as soon as I can :)

 
My poor little bear wasn't feeling so hot today so I quickly snapped a few shots of the hat on her and let her go! Maybe another day I can get some better pictures.


What you need:

Hook: F

Yarn: Patons 100% Wool (worsted weight), 2 colors if you want a band.

Foundation row: Ch 3, 13 hdc in 3rd chain from hook. Join to top chain of original chain 3.

Row 1: Ch 2, hdc in same space, 2hdc in each space around. (28 hdc total) Join to top of ch 2 with a slip stitch.

Row 2: Ch 2, hdc in same space, 1 hdc in next space, *2hdc in next space, 1 hdc in next space* around. Join to top of ch 2 with slip stitch.

Row 3: Ch 2, hdc in same space, 1 hdc in next 5 spaces, *2hdc in next space, 1 hdc in next 5 spaces* around. Join to top of ch 2 with a slip stitich.

Row 4: Ch 2, hdc in same space, 1 hdc in next 6 spaces, *2hdc in next space, 1hdc in next 6 spaces* around. Join to top of ch2 with a slip stitch.

Row 5-11: Ch 2, hdc in each space around. Join to top of ch 2 with a slip stitch.

Row 12, 13: Switch to color for band. Ch 2, hdc in each space around. Join to top of ch2 with a slip stitch.

Row 14: Ch 2, hdc in same space, 1 hdc in next 7 spaces, 2 hdc in next space, *1 hdc in next 7 spaces, 2 hdc in next space* around. Join to top of ch 2 with a slip stitch.

Row 15: Ch 2, hdc in same space, 1 hdc in next 8 spaces, 2 hdc in next space, *1hdc in next 8 spaces, 2 hdc in next space* around. Join to top of ch 2 with a slip stitch.

Row 16: Ch 2, hdc in same space, 1 hdc in next 9 spaces, 2hdc in next space, *1 hdc in next 9 spaces, 2 hdc in next space* around. Join to top of ch 2 with a slip stitch.

Row 17: Ch 1, sc in same space, 1 sc in next 10 spaces, 2 sc in next space, *1 sc in next 10 spaces, 2 sc in next space* around. Join to top with a slip stitch.

Finish off!

I hope you enjoy this pattern! You can sell products you make with this pattern but DO NOT sell this pattern. I spend a lot of time on these pattern and if you appreciate the work I do and would like me to continue, you can donate using the button on the right side (avg. donation is $3). Thanks!

Monday, February 11, 2013

Free Crochet Lego Stuffie Pattern

Like I said, I have Lego on the brain so I whipped up this little stuffie for my youngest who likes to play with her brothers Legos but doesn't take care of them (in fact she JUST now offered to break her brother's Lego truck he just built). This is great for a little one or for a big one.


What you need:

Hook: Size F

Yarn: Worsted Weight

You should know that I crochet my sc in the front stitch and back stitch. I find this gives it a tighter look. If you choose to crochet in just one or the other, your Lego will be a little looser or bigger.

Foundation row: 14 sc, turn.

Row 1: Sc in 2nd chain from hook (first chain counts as first sc), 1 sc in each remaining space (14 sc total) ch 1 (counts as first sc in row 2) turn.

Row 2: 13 sc across, ch 1 turn.

Row 3: 1 sc in next 3 spaces, popcorn stitch, 1 sc next 4 spaces, popcorn stitch, 1 sc in next 4 spaces, ch 1 turn.

Row 4-6: 13 sc across, ch 1 turn.

Row 7: sc in next 3 spaces, popcorn stitch, 1 sc next 4 spaces, popcorn stitch, 1 sc in next 4 spaces, ch 1 turn.

Row 8-10: 13 sc across, ch 1 turn.

Row 11: sc in next 3 spaces, popcorn stitch, 1 sc next 4 spaces, popcorn stitch, 1 sc in next 4 spaces, ch 1 turn.

Row 12-14: 13 sc across, ch 1 turn.

Row 15: sc in next 3 spaces, popcorn stitch, 1 sc next 4 spaces, popcorn stitch, 1 sc in next 4 spaces, ch 1 turn.

Row 16: 13 sc across, ch 1 turn.

Row 17: 13 sc across, ch 1 turn.

This makes the top of the Lego!

Row 18: Sc in the back stitch of each chain space (putting the sc in the BACK stitch creates the edge for your Lego) (13 total), ch 1 turn.

Row 19-23: 13 sc across, ch 1 turn.

Row 24: Sc in the back stitch of each chain space (putting the sc in the BACK stitch creates the edge for your Lego) (13 total), ch 1 turn.

Row 25-40: Sc in next 13 spaces, ch 1 and turn.


Row 41: Using the picture above as a guide, sc in each of the next 13 chains in that stitch (the one pictured above) to give your Lego that edge. Ch1 and turn.
 
Row 42-46: Sc in each of the next 13 chains. Ch1 and turn.
 
 
This is what your piece should look like (make sure it has those ridges or you will just have a big weird lump ;)).
 
 
Attach your last row to the top of the first row with slip stitches across. Now onto the sides!
 
Sides (make 2)
 
Foundation Row: Ch 7, turn.
 
Row 1: Sc in the second chain from the hook, 1 sc in the rest of the stitches. Ch 1, turn.
 
Row 2-17: Sc across, ch 1 and turn (except for last row, no ch 1 and turn)
 
Finish off. (make sure to make two!)
 
Sew the sides to your first part but make sure to stuff your Lego before you finish the second side.


Hope you enjoyed this! Please don't forget to share if you did :) If you like it so much that you want to feed my yarn addiction to make sure I continue making free patterns...you can donate a little something (average donation is $3) on the DONATE button on the right sidebar. Thanks :)
 

Sunday, February 10, 2013

Free Crochet Lego Block

I have Legos on the brain. Not quite sure why. Maybe it is because that is ALL my kids talk about, or the fact that I threw a Lego themed birthday party yesterday, OR because my son built 5 Lego sets in less than 24 hours. Who knows. I'm not Sherlock Holmes. Anyways...what did I do today when I could have spent time doing something for myself this weekend? I crocheted a Lego block! I have grand plans for this thing but obviously it would be perfect for a scarf or whatnot so I decided to go ahead and post it. Hopefully there will be another pattern to follow involving this one!


What you need:

Hook: Size F

Yarn: Worsted Weight (amount needed depends on the project. Obviously a blanket will need more than a scarf.)

Foundation row: 14 sc, turn.

Row 1: Sc in 2nd chain from hook (first chain counts as first sc), 1 sc in each remaining space (14 sc total) ch 1 (counts as first sc in row 2) turn.

Row 2: 13 sc across, ch 1 turn.

Row 3: 1 sc in next 3 spaces, popcorn stitch, 1 sc next 4 spaces, popcorn stitch, 1 sc in next 4 spaces, ch 1 turn.

Row 4-6: 13 sc across, ch 1 turn.

Row 7: sc in next 3 spaces, popcorn stitch, 1 sc next 4 spaces, popcorn stitch, 1 sc in next 4 spaces, ch 1 turn.

Row 8-10: 13 sc across, ch 1 turn.

Row 11: sc in next 3 spaces, popcorn stitch, 1 sc next 4 spaces, popcorn stitch, 1 sc in next 4 spaces, ch 1 turn.

Row 12-14: 13 sc across, ch 1 turn.

Row 15: sc in next 3 spaces, popcorn stitch, 1 sc next 4 spaces, popcorn stitch, 1 sc in next 4 spaces, ch 1 turn.

Row 16: 13 sc across, ch 1 turn.

Row 17: 13 sc across, cut and weave in loose ends.


This pattern can be used to make items for sale but do not sell the patter. If you like this pattern and wish to donate to my yarn addiction you may do so at the donate button on the right side of the page. Please share this page on your blog or Facebook page if you enjoy it enough, but please don't copy and paste the pattern. You may use one image and link back to this page. Thanks so much!

Thursday, July 19, 2012

Little Ice Cream Purse Free Pattern

Whew! It has been hot lately. Thankfully we are getting a little break today. The steamy weather was my inspiration for this little purse. This is a tiny purse meant for a toddler. The strap could pose a strangling hazard so make sure it is short enough that they can't get their heads through, or make it a wristlet.

As usual, since my patterns are free I don't take the time to have them tested. So this is where I need your help ;) If you find a mistake (bound to be at least one honestly), just shoot me an email.

You may sell the items you make with this pattern but please don't sell the pattern.


I forgot to write down the pattern for the "cherry" button but you can use almost any simple crochet button pattern. Mine was about the size of a quarter. This pattern looks like it would work quite well.

What you will need:

Worsted weight yarn in whatever colors you want the cone, ice cream, and cherry to be.

Size G hook.


For the ice cream:

Rd 1: Ch 3, 11hdc in 3rd chain from hook. Join with a slip stitch at top of ch 3.

Rd 2: Ch 2, hdc in same space, 2 hdc in each space around. Join with slip stitch at the top of ch 2.

Rd 3: Ch 2, hdc in same space, *1 hdc in next space, 2 hdc in next space*. Repeat from * to * around. Join with a slip stitch in the top of the chain 2.

Rd 4: Ch 2, hdc in same space, *1 hdc in next space twice, 2 hdc in next space*. Repeat from * to * around. Join at top of ch 2 with a slip stitch.


Now for the ice cream bumps you are going to start exactly where you left off. From where you made your last slip stitch (that being space 1), count 2 more spaces. That 3rd space (as shown in the picture) is where you are going to make the ice cream "bumps" (is that their technical name?).


Your "bumps" will consist of 6 dcs in the space pictured above.


This is what one bump will look like.


Slip stitch in the 3rd chain from where you made your "bump".


Make 2 more "bumps". You will need two of these ice cream tops to make your purse.

Now for the cone:


Rd 1: Ch 20, hdc in each space across.

Rd 2: Ch 2, hdc together in next 2 spaces, hdc across except for last 2 spaces. Hdc together in last 2 spaces.

Rd 3-8: Ch 2, repeat round 2 pattern by doing a hdc together in the first 2 and last 2 spaces and hdcs in the spaces between.

Rd 9: Ch 2, hdc together, hdc.

Rd 10: Hdc together.

Make another side to your cone.


To attach the cone to the ice cream, line up the top of the cone to the bottom of your ice cream (the bumps will be hanging out on the other side. Just make sure they are lined up with the top of the cone).


Your cone will look like this. Don't worry that it has that bump in the middle. That will give your ice cream a 3D look once it is all together and has little trinkets in it!


Line up your two pieces, wrong sides together and sew them together however you prefer, leaving an opening of your desired length at the top (I left 18 spaces open). If you have never sewn crochet pieces together, just search on Google. There are lots of good tutorials.

I didn't take pictures of making the strap and button loop but they are pretty easy.

For the button loop I just found 3 spaces in the very middle of the ice cream opening and joined my yarn to the first space on one side. Then I made a chain of 8, skipped a space and joined with a slip stitch. On the other side in the exact opposite spot I sewed the "cherry" button.

For the strap I chained 41, turned and sc across each chain stitch. I then sewed it onto each side of the opening.
If you enjoy this pattern, or sell some items made from this pattern and wish to contribute to my blog, you can find the donate button on the right sidebar. Thanks!

Thursday, May 31, 2012

Insulated and Reusable Water Bottle

Well, long time no see! Or should I say long time no blog? Oh well. It has been a very busy spring here but I am back, and with a very easy pattern for you!

It has been rather hot here lately and I have been drinking a crazy amount of water. Most summers I don't drink enough water so I am trying to be more healthy, blah, blah, blah ;) We never use disposable water bottles (I won't get preachy, I will just stick to "they suck"). The problem is we only have 3 of those metal water bottles and there are 4 of us.

I used up the last of my vinegar which just so happened to come in a pretty cool looking bottle. I rinsed it out lots to get rid of the vinegary smell and took off the label (hot water and a scratchy pad). I don't use ice but I wanted to make it insulted a little for when I am working in the garden or selling at market and this is what I came up with!


My very own insulated and reusable water bottle! It was super easy to make and this is more a set of guidelines then a pattern.

You will need an H hook, some worsted weight yarn, and a bottle.

For the bottom:

Round 1: Ch 3, 12 hdc in 3rd chain from hook. Join with a slip stitch in the top of the first hdc.

Round 2: Ch 2 (this counts as your first hdc), hdc in same space. 2 hdc in each space around. (24 hdc) Join at top of ch 2 with a slipt stich.


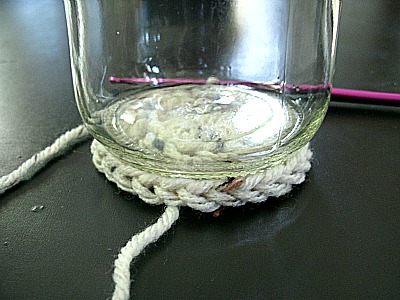
This is what your bottom should look like. You want the bottom to be slightly smaller than your bottle...like this.

You want the whole cozy to be slightly smaller so it doesn't slip off so this is perfect. If you have a particularly large jar you can go out another row which would be

Optional Round: Ch 2, hdc in same space, 1 hdc in next space. Repeat around. (36 hdc)

Round 3: Ch 2, working in the back loops, hdc around. Join with slip stitch in top of ch 2. Repeat round 3 as many times as it takes to make the cozy as tall as you need.

Now slip your cozy on your bottle...


You can add a flower or buttons if you like. I used this pattern from Lucy of Attic24. Congrats! You took something that was destined for the trash and made an awesome, reusable, water bottle. Plus you can save lots of money by using these instead of yucky, plastic, disposable bottles! Enjoy :)

Friday, February 17, 2012

Free Floppy Bunny Crochet Slippers Pattern


Eeeeek! I couldn't help myself! I just love them :)
Warning: This tutorial is seriously photo heavy. I wanted even beginners to be able to make these!

I have been crocheting like crazy lately. I am trying to destash a bit and I am also (for lack of a better term) dieting. Well I am just trying to lose a little weight and eat more healthy and crocheting keeps my mind off of wanting to eat junk food all day!

I have been wanting to make my daughter a pair of slippers for some time now. There don't seem to be too many toddler slipper patterns out there so I just went on to make my own. I wasn't planning on putting the pattern up here as it was supposed to be just plain old slippers but after I made the first pair it just hit me that these needed a bit more. I started thinking about it and my floppy bunny hat pattern and the next thing you know I was writing down a pattern and taking a bunch of pictures. I mean, people need this pattern way before Easter so they have time to make them!

I tried to make the pattern as in depth as possible so that even a beginner could give it a go. As always, my patterns have not been tested so if you run into a problem I would appreciate if you emailed me and I will change it (find my email in the Contact page below my header).

Now for the pattern itself, it took me a long time (a little too long!) to get it just right. There was a lot of math (at least a lot for me!), and ripping out and trial and error and such so I would appreciate if you took a moment to read my pictures and pattern use policy if you plan on selling the finished product or linking to this product (which I am always super grateful for!). So yes, you can sell the finished product :) but not the pattern. Like I said, please read my policy first. If you do happen to sell some or just really appreciate the pattern and would like to contribute to the blog, you can find my donate button on the right sidebar. Thanks!!!

I also recently made a Facebook page. If you have a FB account make sure to like my page (you can find the "like" button in the right sidebar) so you can get instant updates on new patterns and blogginess :) Also, if you haven't become a follower yet, don't forget to!


First I want to discuss gauge and yarn and all that boring but important stuff. The first pair of slippers I made using Red Heart Super Savers yarn. The bunny slippers were made from Mary Maxim yarn which is another worsted weight yarn. I used the same hook and same pattern but you can see the difference. Just goes to show how the slightest change in any element can result in a different pattern. I highly suggest you check the gauge before starting.

Also there is no instep on these slippers. They are both exactly the same. I don't think that an instep is necessary on a toddler slipper. I mean, their feet are usually so chunky there isn't really an insole anyways :) They fit my daughter great.

Ok...on to the pattern!

Floppy Bunny Slippers:

Size: These slippers fit perfectly on my 2 1/2 year old. I would say they could probably fit nicely on most 2t-3t girl's feet.

Gauge: Since this is a pretty quick project, I just measured the finished sole of the slipper and it was 5 inches long and 3 inches wide. If yours is measuring too big or too small I would try changing hook sizes.

Hook size: G

Yarn: Worsted weight, but like I said above, it is best to check the gauge on this project.

Other: 4 buttons for the eyes. Buttons are a choking hazard to children under 3 or children who still chew on stuff. Please use buttons with caution!


To start, chain 14.
Round 1: Ch 2 (counts as your first dc and will continue to count as a dc for the rest of the pattern), 2 dc in 3rd chain from hook.

10 dc down the foundation chain.

In the last stitch, dc 8 going around the end like you see in the pic above.

Now, on the other side dc 10 times down the side.

Dc 3 times in the same space that you have your ch2, 2dc. Join with a slip stitch in the top of the chain 2.

Ch 2, dc in same space, 2 dc in next space, 2 dc in next space (6dc altogether. Ch2 counts as dc). Dc in next 10 ch down the side. 2 dc in next space times 8 (in the pic above I have just finished the first 4 groups of 2dc).

10 dc down the other side. In the same space as your ch2 dc, add 3dc. Don't join yet. I did in the pic above on accident. You will want to switch colors (refer to next pic). You should now have an oval like the pic above. The heel is where you started and the front (with the 8dc) is slightly bigger to fit all those cute little toes. 

Join with your white. Ch 2. Dc in next space (make the chains in the front loops of the previous row).

Dc in each space around. There should be 48 dc total (ch 2 still counts as a dc). Join to the top of the ch 2 with a slip stitch.

Ch 2, dc in each of the next 15 spaces. Dc tog (or dc decrease) in next stitch. Repeat dc tog in next 3 spaces as shown above.

Dc in next 16 spaces. Join to the top of the ch 2.


Ch 2 (counts as first dc), dc in each of next 15 spaces. Dc tog 8 times (this means you do 8 dc tog over 16 stitches. The dc tog will reduce the amount of stitches to 8). Dc in each of the next 16 spaces. Join with a slip stitch in the top of the ch 2.

(Forgot to take a pic of this but I think you probably get the it by now) Ch 1, sc in each of the next 15 stitches.
Here is where you will make the nose. Put your hook through both loops (I used both loops for the next 3 spaces. I thought it made the nose look better) of the first dc tog of the previous row.

Join your pink color with a sc.

Hdc in each of the next 2 spaces. Sc in next stitch. Cut off your pink and join back with your white. sc in each of the next 16 spaces. Join to top of ch 1 with a slip stitch.

Ch 1, sc in each of the next 9 spaces. Ch 4 (this is going to be the "strap").

Join to opposite side (17th space from your ch 4) with a slip stitch. Sc in remaining spaces. Join to top of ch 1 with a slip stitch.

Ch 1, sc in each space around. Join to top of ch 1 with a slip stitch.

Floppy Bunny Ears:

Ch 12. Sc in 2nd ch from hook.

Sc in next ch, hdc in each of next 2 spaces, dc in each of next 2 spaces, trc in each of next 5 spaces. (it gets a little confusing here but reference the pic if you get confused) Working in the side of the last trc slip stitch twice.

Ch 2.

Working up opposite side, 5 trc, 2 dc, 2 hdc, 2 sc (just like the opposite side). Tie off. Make 4 ears altogether.

Now you can just attach those ears on the top of the outside of the heel. I just securely sewed them on with a scrap piece of yarn and a darning needle. Sew on the eyes (remember, buttons are a choking hazard for children under 3!) securely. I added some dots of puff paint to make these less slippery to wear. We have mostly carpet so we don't have to worry too much. These would be pretty darn slippery on wood floors or other non carpeted areas, so be careful :)

This is the only picture I could manage to get of the slipper on my daughters foot. Believe me they are adorable. She just loves them! She loves a new pair of shoes and to her these are just as good as a shiny new pair of shoes :) I hope they are perfect for your little Easter bunny too!

If you are looking for more fun bunny crochet patterns, please check out KnitandCrochet.net for many more ideas. Here is a direct link to their directory of Bunny Patterns http://knittingandcrochet.net/knitting-and-crochet-patterns/