As usual, since my patterns are free I don't take the time to have them tested. So this is where I need your help ;) If you find a mistake (bound to be at least one honestly), just shoot me an email.
You may sell the items you make with this pattern but please don't sell the pattern.
What you will need:
Worsted weight yarn in whatever colors you want the cone, ice cream, and cherry to be.
Size G hook.
For the ice cream:
Rd 1: Ch 3, 11hdc in 3rd chain from hook. Join with a slip stitch at top of ch 3.
Rd 2: Ch 2, hdc in same space, 2 hdc in each space around. Join with slip stitch at the top of ch 2.
Rd 3: Ch 2, hdc in same space, *1 hdc in next space, 2 hdc in next space*. Repeat from * to * around. Join with a slip stitch in the top of the chain 2.
Rd 4: Ch 2, hdc in same space, *1 hdc in next space twice, 2 hdc in next space*. Repeat from * to * around. Join at top of ch 2 with a slip stitch.
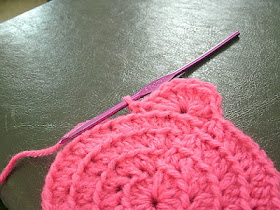
Now for the ice cream bumps you are going to start exactly where you left off. From where you made your last slip stitch (that being space 1), count 2 more spaces. That 3rd space (as shown in the picture) is where you are going to make the ice cream "bumps" (is that their technical name?).
Your "bumps" will consist of 6 dcs in the space pictured above.
This is what one bump will look like.
Slip stitch in the 3rd chain from where you made your "bump".
Make 2 more "bumps". You will need two of these ice cream tops to make your purse.
Now for the cone:
Rd 1: Ch 20, hdc in each space across.
Rd 2: Ch 2, hdc together in next 2 spaces, hdc across except for last 2 spaces. Hdc together in last 2 spaces.
Rd 3-8: Ch 2, repeat round 2 pattern by doing a hdc together in the first 2 and last 2 spaces and hdcs in the spaces between.
Rd 9: Ch 2, hdc together, hdc.
Rd 10: Hdc together.
Make another side to your cone.
To attach the cone to the ice cream, line up the top of the cone to the bottom of your ice cream (the bumps will be hanging out on the other side. Just make sure they are lined up with the top of the cone).
Your cone will look like this. Don't worry that it has that bump in the middle. That will give your ice cream a 3D look once it is all together and has little trinkets in it!
Line up your two pieces, wrong sides together and sew them together however you prefer, leaving an opening of your desired length at the top (I left 18 spaces open). If you have never sewn crochet pieces together, just search on Google. There are lots of good tutorials.
I didn't take pictures of making the strap and button loop but they are pretty easy.
For the button loop I just found 3 spaces in the very middle of the ice cream opening and joined my yarn to the first space on one side. Then I made a chain of 8, skipped a space and joined with a slip stitch. On the other side in the exact opposite spot I sewed the "cherry" button.
For the strap I chained 41, turned and sc across each chain stitch. I then sewed it onto each side of the opening.
If you enjoy this pattern, or sell some items made from this pattern and wish to contribute to my blog, you can find the donate button on the right sidebar. Thanks!


Bellissimo brava grazie per l'idea ciao Giuliana Italy
ReplyDeleteAwesome!! Thanks for sharing this purse is darling!
ReplyDeleteHow did you make the cherry button?
Oh I see your link and what you wrote about the cherry button... I can't wait to make this! :) :) :)
ReplyDeleteI had a question, when you attach the ice cream to the cone, is there suppose to be extra "cone" on the sides? I feel like I have an excess amount lol =)
ReplyDeleteIt's been awhile since I made this but I don't think I had any excess. Try stretching the ice cream part a bit to fit the top of the cone.
ReplyDelete